
The kick drum is one of the most crucial parts of a drum kit, dictating the feel and energy of any section of a song that it populates. How it is mixed into a track has a huge impact on the overall feel of a song.
Whether you’re a professional audio engineer or you produce your own music as a hobby, you have many tools at your disposal in order to manipulate and improve the sound of your drum recordings. One of which is a tool called a compressor.
Contents
Why Use Kick Drum Compression?
A compressor is just one tool in the dynamic processing category (along with a limiter, expander, and noise gate). Dynamic processing is just a fancy way of saying that the tool controls the loudest and quietest parts of an audio file, and that is exactly what a compressor does.
When you add compression to a track/audio file, so in this case, a drum performance; it essentially smoothens the audio level throughout the track. It makes the louder hits quieter, and the quieter hits louder, resulting in a more consistent performance.
In this ultimate guide to kick drum compression, I’m going to give you all the necessary knowledge on how to use a compressor effectively so you can make your kick drum recordings sound incredible.
Let’s take a tour around the parameters of a typical compression plug-in and how it affects a kick drum.
Threshold
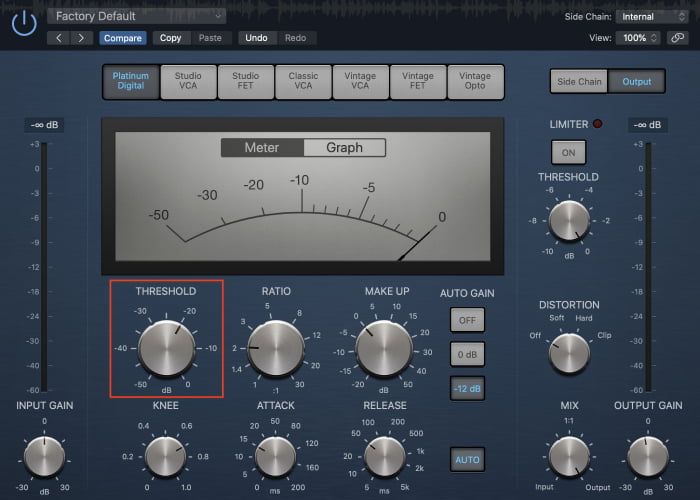
This is the level at which the compressor starts working. When the level of the audio goes beyond this threshold, the compressor will start reducing the levels of the audio, therefore only affecting the loudest sections. Any hits that fall below the threshold level will be unaffected.
When you open a compression plug-in, the first thing you should do is set the threshold level. I personally do this by reducing the level until I see the compressor at its default state start to become active throughout the performance (while the track is playing).
This, at the very least, means that when you start altering the other parameters, it will actually be affecting the audio. You can go back to the threshold later as always and fine-tune if necessary.
The lower you set your threshold, the more sensitive your compressor will be.
If you want the compressor just to reduce the levels of the loudest hits, keep it high so it only triggers at those loudest hits. If you want to completely squash your recording for a very consistent (almost mechanical sounding) performance, make sure it’s low so it’s almost always active.
Ratio
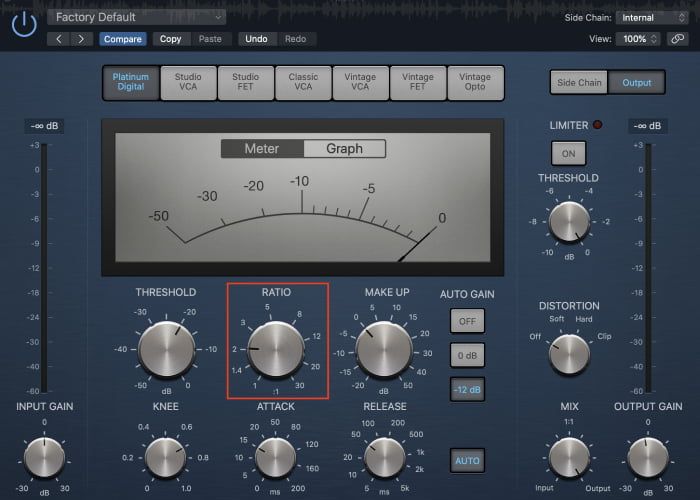
The amount of compression (level reduction) of the affected audio is determined by the ratio. Generally, most compressors go from 1:1 (no compression) to 20:1 (very hard compression).
Here’s a few examples of the maths behind the ratio:
2:1 – For every 2dB of audio over the threshold, 1dB will come out. So a kick drum hit goes 10dB over the threshold, and you used a ratio of 2:1, the compressor would still let 5dB out that hasn’t been compressed. Therefore this gives you a 5dB (50%) gain reduction, which is very soft.
10:1 – For every 10dB of audio over the threshold, 1dB will come out. So a kick drum hit goes 10dB over the threshold and you used a ratio of 10:1, the compressor would let just 1dB out that hasn’t been compressed. Therefore this gives you a 9dB (90%) gain reduction which is much harder.
There is absolutely no such thing as a one size fits all ratio for compressing drums. Every recording is unique in one way or another so you should aim to achieve the specific sound you want to achieve.
A lower ratio will make your kick drum sound more natural by maintaining the inconsistencies in the audio levels of the hits in the drummer’s original recording.
The higher you go with the ratio, the more you will squash the loudest hits down to a similar noise level of the quietest hits. This would be more suited for polished, high-production-value mixes, although you lose that human feel.
I could sit here and give you a golden ratio, but as I mentioned, this won’t benefit you in the slightest. Go into your DAW of choice and start using compressors on your kick drum recordings, notice the subtle differences and train your ears to work to your taste.
The threshold and ratio are the two main tools that focus on the amount of compression. Rather than shaping the sound as such, these are more for the consistency of the audio levels. Saying that, don’t underestimate the impact that the consistency (or inconsistency) of the kick levels can make.
Attack
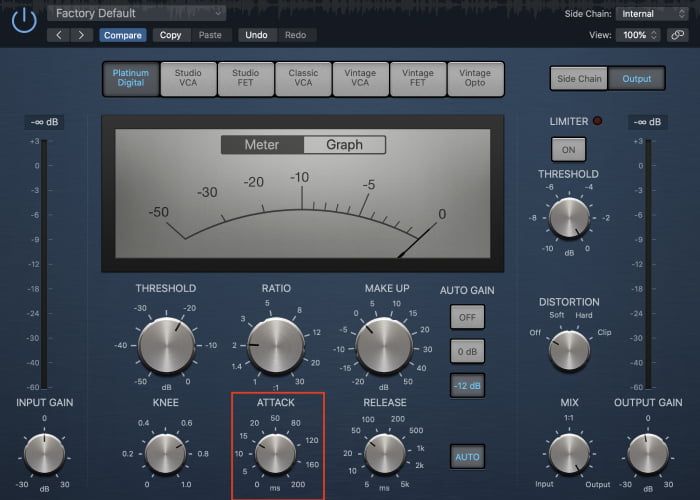
The attack is the amount of time it takes for the compressor to activate after the audio exceeds the threshold level. The shorter the attack time, the faster are more harshly the compressor will kick in. A longer attack time will bring in the compressor more gradually for a smoother, dampened sound.
This is where you can start to really shape the sound of the kick drum in a production. Have you heard of the term ‘punch’ when it comes to describing drums in a mix? This little parameter will help you achieve that – more on that shortly.
In comparison to cymbal and tom hits, your kick drum produces a very short burst of audio in your waveform. It comes and goes pretty quickly.
Therefore you need to set your attack time low enough for the compressor to actually come into effect before the waveform ends.
The loudest part of the kick drum hit, visually represented within a waveform in your DAW is always at the beginning of the hit. This is known as the transient. The more of this transient you compress, the less powerful but smoother your kick drum will sound. Vice-versa.
The attack setting is basically a direct dial for how much of this transient you want to compress. With an attack of anywhere over 30ms, you start to bypass the compressor whilst the loudest part of the kick drum hit is playing.
This means that the compressor lets that transient through, uncompressed; whilst compressing (and quietening) the rest of the audio after the transient. This drastic difference between the loud transient and the quiet sustain/release of each hit creates a punchy, thumping kick drum that jumps out of a mix.
The higher you go, the more powerful the sound. That of course is until you’re not compressing any of the audio because there’s that much of a delay before the compressor starts. So be careful not to go overboard with this.
On the other hand, if the kick drum is too abrupt for your mix, lowering the attack will control and smoothen out this transient which very noticeably will make your kick drum sound more round and soft.
Release
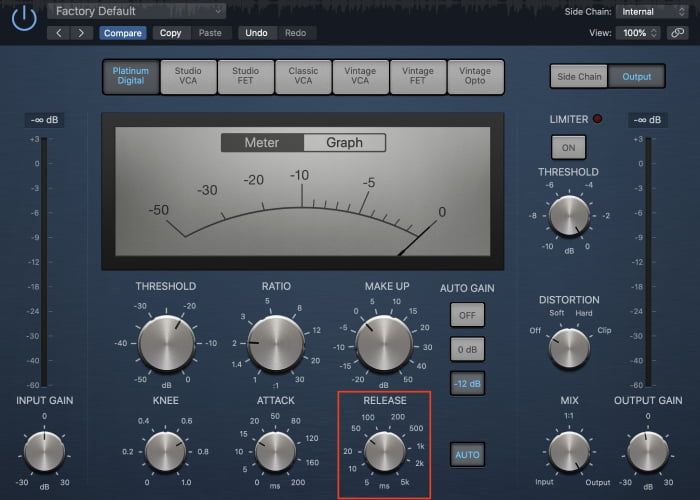
The release is the amount of time it takes for the compressor to become inactive after the audio drops below the threshold level. The shorter the release time, the faster are more harshly the compressor will stop working. A longer release time will ‘shut off’ the compressor more gradually.
As you can imagine, similar to the attack, this can really shape the sound of a kick drum recording. It tends to mainly affect the sustain of your hits, which is the middle section of each waveform.
A short release time chokes the back end of each hit, almost bringing it to a complete halt. This creates an energetic, aggressive, pumping feel in a track when used on a kick drum. Because you’re neglecting the quietest section of a kick drum hit, this action also makes the audio perceived to be louder.
As you increase your release time so it’s slower, you compress more of the waveform so you get more dynamic control and, therefore less energy. This is another way of making a kick drum sound softer.
Be aware that too much release can completely suck the life out of a sound. Combined with the fact that a kick drum is a short piece of audio, it can be very easy to overdo this. Keep it relatively short.
Make Up Gain

After you have used all of these parameters to compress your kick drum to your taste, chances are the overall audio level is now much different from what it was before (either louder or quieter).
Yes, in theory, you could always adjust the main level fader to combat this. However, it’s good practice to use the make up gain in your compressor instead, to adjust the audio level of the track. Your aim is to get the audio level to a similar level it was before you started compressing.
You can do this easily by playing the track through and bypassing the compressor as you go, to hear the before and after levels. It’s literally then just a case of matching these up as closely as you can using the make up gain knob.
Gluing Your Drums Together
If you’re compressing drums for a mix or a drum cover, a handy tip for you is to add some overall compression to your whole kit after individually treating your kick drum and other tracks. This makes your whole kit sound more cohesive and natural.
Send all your drums audio tracks to the same auxiliary channel via a bus and then apply some overall light compression to everything. With each drum/channel having different types of compression and settings, this can really help glue them back together and sound as one.
I hope you have enjoyed this article on kick drum compression! Remember to not take notice of the people telling you exactly what to do when it comes to compression settings, because it’s not a one size fits all thing.
The most important thing for you to do is to get in your DAW and start playing with a compressor yourself. When you can hear for yourself how each parameter effects the audio, you will then train your ears on how to use compression effectively to your taste.
If you haven’t already, feel free to check out our in-depth guide to kick drum EQ too!
━━━━━━━━━━━━━━━━━━━━━━━━━━━━━━━━━━━━━
This guest blog was written by my friend Eddie at Professional Musician Academy. The Professional Musician Academy is the #1 online business school for aspiring professional, hired-gun, and session musicians. Their mission is to help you monetize your passion for music so you can do what you love for a living.