Miking drums is one of the trickiest things to do, considering that there are so many components in a drum set.
Knowing how to mic drums is a skill that people take years to develop, and knowing how to mic drums for recording amazing audio often takes even longer.
There are fundamental basics that are easy to pick up, though. You’ll need to know a few general rules, and you’ll also need to know what equipment to use.
In this guide, we’re going to look at how to mic a drum set. I’ll explain what you need beforehand, and I’ll give you different placement options depending on how many mics you have. I’ll also show you a drum mic setup diagram for each placement option.
Contents
How to Mic a Drum Kit

Miking a drum set involves strategically placing microphones to capture the different components of the kit and achieve a balanced and accurate sound.
Below I will list the various techniques and mic setups you can use to record a drum set depending on the number of microphones you have available.
To record drums, you will need a drum set, microphones, mic stands, XLR cables, an audio interface, a computer with recording software, and monitoring equipment such as studio monitors or headphones.
Later on in this article, I’ll list all the gear you need in greater detail, along with some of my recommendations.
Recording Drums with 1 Mic

Recording a kit with only one microphone can be very challenging. Mic placement for drums becomes more important than anything, as the position your mic is in determines the entire sound of your kit.
You’ll get the best results when using a large-diaphragm condenser microphone that has a very wide pickup range, along with a wide frequency response range.
For your placement, the best thing to do is place the microphone a few feet in front of your drum set.
The higher you raise it, the more sounds you’ll get from your cymbals. The lower you place it, the more low-end sound you’ll get from your kick drum.
You’ll need to find a good balance between those two extremes.
Recording Drums with 2 Mics
A 2 mic drum recording is a lot more ideal to work with than a single-mic one. You can use one mic as an overhead and another one as a kick drum mic.
For the kick drum mic, place it inside or just outside the bass drum.
You’ll need a port hole in the resonant head for this. You’ll get a focused, low-end punchy tone from this placement.
For the overhead mic, you should place it above the drum set.
An ideal place to put it is just over your shoulder, and you should position it so that it picks up all the drums and cymbals evenly.
Recording Drums with 3 Mics

Having a pair of matched overhead drum mics instead of one will give you a clearer overall picture of your drums and cymbals.
Your kick drum mic will sit in the same position as the previous setup, but the overhead mics will be positioned slightly differently.
You can place mic stands in front of your drums, and then the overhead mics should be an equal distance from each other. The one on the right should be pointing at your snare drum, and the other should be pointing at the point between your floor tom and ride cymbal.
In terms of height, a good rule of thumb is to have them placed a drumstick’s length from your highest cymbal.
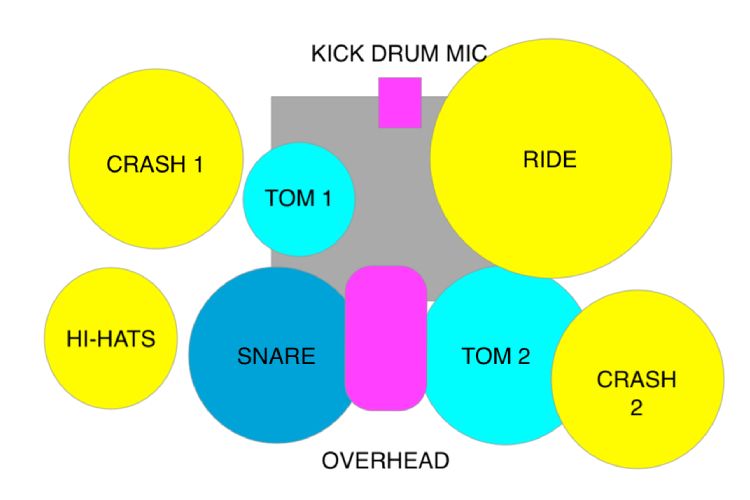
Recording Drums with 4 Mics

Recording drums with four mics is the most ideal option, as the fourth microphone can be used as a snare mic.
With your snare drum being one of the most important drums in your set, it’s good to have a dedicated snare microphone so that you can have more control over the snare sound.
When placing a microphone on your snare drum, make sure that it’s pointing at the center of the drumhead.
Also, it’s best to position it between the first rack tom and the hi-hats so that it doesn’t get in the way when you’re playing.
Recording Drums with 6 Mics

This setup will have you setting the mics up in the same way as the previous setups, but you’ll put two more on the rack tom and floor tom.
As I said earlier, it’s better to have tom mics on clamps that attach to the rims to keep the space clear. You should also make sure that these mics are pointing at the center of each drumhead.
To make sure that the mics are out of the way of your striking zone, it’s typically better to place the rack tom mic slightly to the left and the floor tom mic slightly to the right.
If you have more than just two toms, you’ll just need to use the same setup structure and add as many mics as you have toms.
Recording Drums with 7 Mics

This setup will be the same as the previous one, but you’ll add an extra condenser mic near your hi-hats.
While your two overhead mics do a great job of picking up all the cymbals, it’s sometimes good to have an extra mic to get a clearer sound from your hats.
You should place the hi hat mic straight down at the hi-hats and have it sitting at a height that is 3” to 4” above the top hat.
Some drummers like to place the hi hat mic underneath the hats, but you’ll get a lot of bleed from the snare when doing that.
Recording Drums with 9 Mics
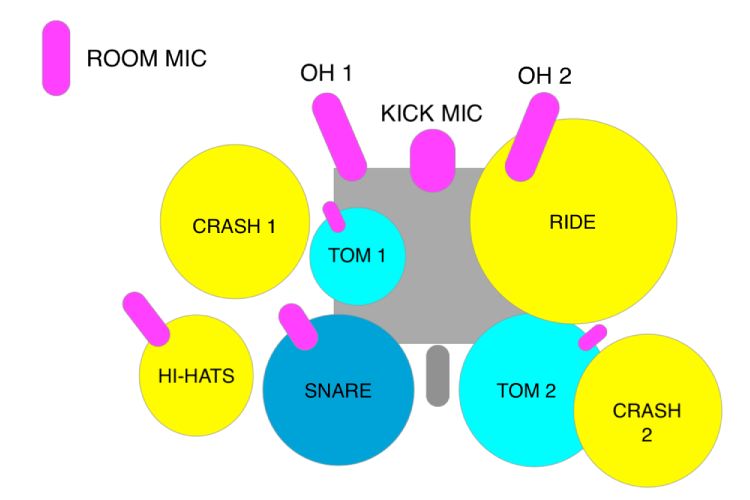
This final setup will also be the same as the previous setup, but you’ll have two extra mics to work with.
The first mic will go underneath your snare drum. Having an extra mic on your snare drum will give you clearer response from your snare wires. It will also give your snare drum sound a lot more body.
The second extra mic can be used as a room mic. This will add natural reverb from whatever room you have your drum kit in. You could also put the mic in the room outside to get a hallway effect.
What You Need for a Drum Microphone Setup
Microphones
Microphones are the main tool that you need for micing drums. You need more mics for drum kits than you do for most other instruments, and a combination of condenser and dynamic mics works best.
It’s best to use dedicated drum mics from brands like Sennheiser, Audix, and Shure, but you can use any microphone for the purpose of recording drums. It just needs to have the right frequency response to match the frequencies of the drum or cymbal that you’re pointing it at.
Higher-quality microphones tend to be a lot easier to work with, as they’re truer to the original sound source, and they often have flat responses that make mixing them better.
Audio Interface
If you want to record a drum kit, you need to have an audio interface to run the mics through to a computer.
Audio interfaces come in all shapes and sizes, but it’s best to have one with at least eight channels when working with a drum kit. Even if you only have two mics, you may use more in the future, and you’ll need to get a new interface if you only have one with a few channels.
Here are a few of the most popular audio interfaces that drummers use:
Digital Audio Workstation (DAW)
When you connect an audio interface to a computer, you need to have a DAW to send all the signals to. The DAW is the audio production software that you use for recording the drums and making other music.
Most audio interfaces come with simplistic mixing software, but you’ll do most of the intricate mixing, mastering, and EQing on the DAW.
Here’s a list of the most popular DAWs:
- GarageBand
- Logic Pro X
- PreSonus Studio One
- Ableton Live
- Pro Tools
Mixer
If you want to mic your drums for a live event so that they play through speakers, you’ll need to get a mixer. The mixer will connect to a PA system, and you can use the mixer to control the sounds that you get through the microphones.
As with an audio interface, you need to get a mixer that has enough channels to cover all the mics on your drum kit. If you have a 10-mic setup, you’ll need ten channels. If you have a 2-mic setup, it’s still better to have a mixer with ten channels.
Here are some good mixers to check out:
Microphone Cables
Every microphone that you place around the drum kit will need its own XLR cable to connect to the audio interface or mixer.
You should buy cables that are long enough to fit around your drum set very comfortably. They should always run along the floor without interfering with anything.
It also helps to get cables with various colors to match your drums. If you have a green cable for your snare drum mic, you’ll know exactly which cable to use when you have it at your interface or mixer.
Having cables that are all black often makes you have to trace them back to see which drum mic they’re connected to.
Mic Stands and Clamps
The final things that you need for a mic setup for drums are stands and clamps. You’ll need microphone stands to put your overhead mics on, and it helps to get a dedicated kick drum mic stand as well.
You can use a normal mic stand for a kick mic, but specialized kick mic stands are smaller and help to keep your space clear.
You can also use mic stands for the drum mics, but it’s better to get mic clamps that latch onto the rims. These clamps also help keep your space as clear as possible around the kit, lowering the overall footprint.
Which Microphones Work Best for Different Drums
Cymbals
Cymbals are always picked up using overhead microphones. It’s best to use condenser mics for them, as they have wider pickup ranges than dynamic mics.
If you’re just using one microphone for your cymbals, it’s often better to use a large-diaphragm mic. Most drummers use two, and they’re typically small-diaphragm condenser mics.
Bass Drum
The best microphones to use for bass drums are ones that have been specially designed for them. Since bass drums are so important in music, you’ll find almost every microphone brand selling one or two dynamic bass drum mics.
These microphones are built to enhance all the low frequencies that you get from kick drums, and they’re all small enough to fit through a bass drum port hole.
You can use a condenser microphone for a bass drum as well. It will just be a bit trickier to work with in a mix.
Hi-Hats
You can typically use the same mics for hi-hats that you can use as overheads. It’s another cymbal microphone, so you’ll need the same properties.
However, you only need one hi-hat microphone in most cases. When drummers get purchase overheads, they often purchase three of the same so that they can use the one for getting a better hi hat sound.
Snare Drum
Dynamic mics are normally the best option for snare drums, and there are several highly popular ones that everyone tends to use.
With most drummers playing a lot of rimshots, your snare drum mic needs to have a very high SPL handling. It should also be a small enough dynamic mic to fit comfortably within your setup.
Toms
Toms have wide tonal ranges, and the best options are typically dynamic mics with wide frequency response levels.
The best tom mics are also very small, as you don’t want bulky mics that are in the way when you’re playing drum fills.
Conclusion
The biggest thing to remember about all these setup ideas is that they’re just guidelines. Experienced studio producers all have their own techniques that they figure out through experience to get desired drum kit sounds.
If you’re new to recording drums and putting mics on them for live gigs, start with the ideas mentioned here. When you do it enough, you’ll start to develop your own techniques that you’ll find work for certain things.
Just remember that placing your microphones well will make the mixing process a lot easier, so always focus on that first.