
The kick drum (or bass drum) is one of the main driving forces of your drum kit. Along with your snare, the kick drum also plays a huge part in determining the feel of a piece of music. Whether that’s a syncopated, off-beat feel for jazz or a 16th note blast beat in a metal track.
When it comes into context with a full mix, how you EQ your kick drum also plays a huge part in the overall sound of the track. For example, in modern metal tracks you want that a powerful, cutting kick drum tone. Alternatively in dance genres, you want a lot of sub-bass and ‘thud’.
So whether you’re recording drums in your studio, editing/mixing drum projects or your own drum covers; learning to how to EQ a kick drum is something you must learn and become comfortable with. In this article, I’m going to help you do just that.
Contents
What is Kick Drum EQ?
EQ is an abbreviation of ‘equalization’, and this is the act of cutting/boosting certain bands of frequencies to enhance the sound of a track. This comes in many forms including hardware/outboard studio gear and more familiarly with you, as a digital plug-in in your DAW.
There are two main reasons why we should use EQ;
- To cut certain frequencies out – getting rid of problem frequencies, preventing certain aspects of the mix masking together or to create room for something else.
- To boost/create more of certain frequencies – making a mix sound fuller or improving the overall sound/tone of an instrument.
Before I get into the nitty-gritty of how to EQ a kick drum, let’s quickly go over the 3 types of EQ you can use; pass, shelving, and parametric. These are detailed below:
Pass Filters
Using Pass filters is a very simple EQ method where you block (cut out) all low or high frequencies to one side of a set cut-off frequency. You can sometimes control the angle of the ‘slope’ of this cutoff which determines how gently (or not) the filter comes into effect.
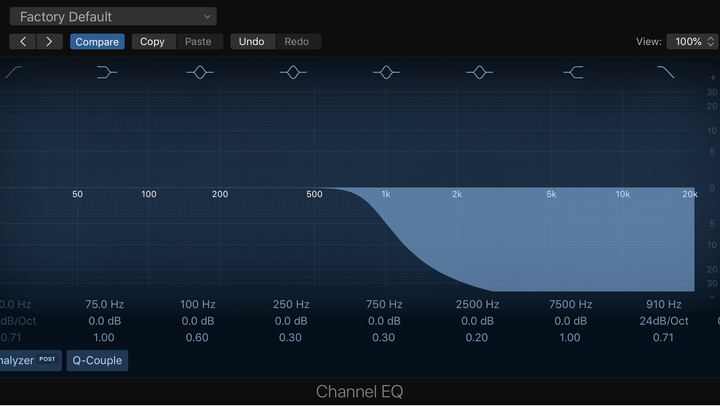
- Low Pass Filter: An EQ curve that only lets through low frequencies and cuts all frequencies above where it is set. You could use a low pass filter on a kick drum to get rid of any unnecessary high frequencies. (TOP)
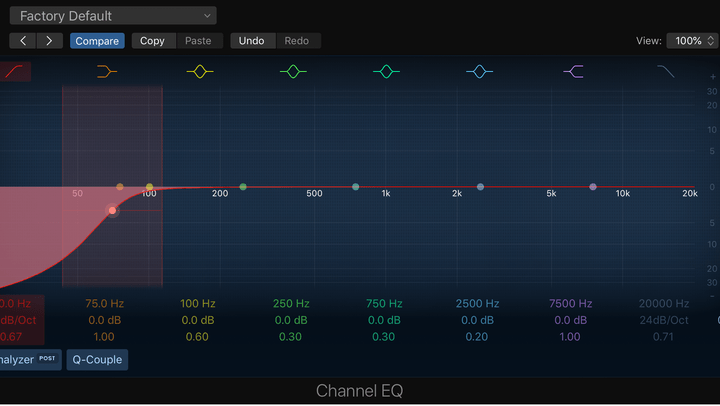
- High Pass Filter: An EQ curve that only lets through high frequencies and cuts all frequencies below where it is set. You would tend to use a HPF on your kick drum EQ to cut out any rumble, floor noise, and unwanted low-end frequencies. (BOTTOM)
Shelving Filters
Shelving filters are what you will be commonly using on speaker systems while controlling bass and treble settings. This type of EQ control gives you very limited ‘fine-tuning’ and involves cutting or boosting large bands of frequencies at a time. This does have some useful applications, though.
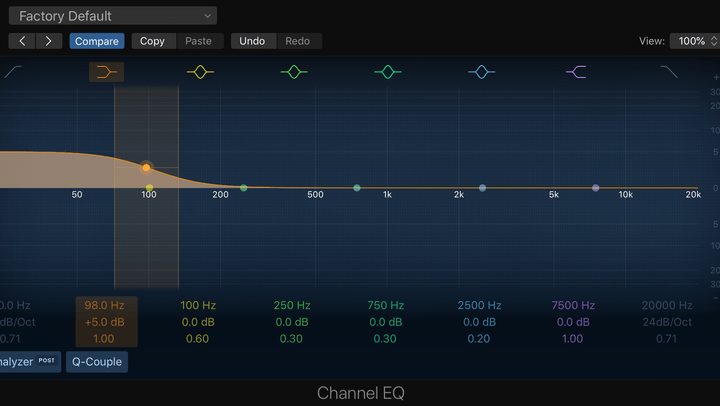
If you wanted to tame the low frequencies of a kick drum, but not completely get rid of them; using a low shelving cut may be more appropriate than a high pass filter, for example. This is what a low shelving boost would look like:
Parametric Filters
These filters are commonly given to you in most graphic EQ plugins and are what allows us to fine-tune specific frequencies. You can control the bandwidth (frequency range) to focus on a more narrow (or broad) section of frequencies. This setting is often called the ‘Q’.
Common Problems You Can Fix With Kick Drum EQ
First of all, you should never solely rely on kick drum EQ to achieve a great kick drum tone. Remember that it always starts at the source; a well-tuned and recorded kick drum will leave you with very little EQ’ing to do.
Saying that though, equalization can be a great tool for fixing various problems with badly recorded kick drums and help improve the sound of them in the context of a full mix. Here are some common issues you may have with your kick drum and how you can dial in your kick drum EQ settings to fix them.
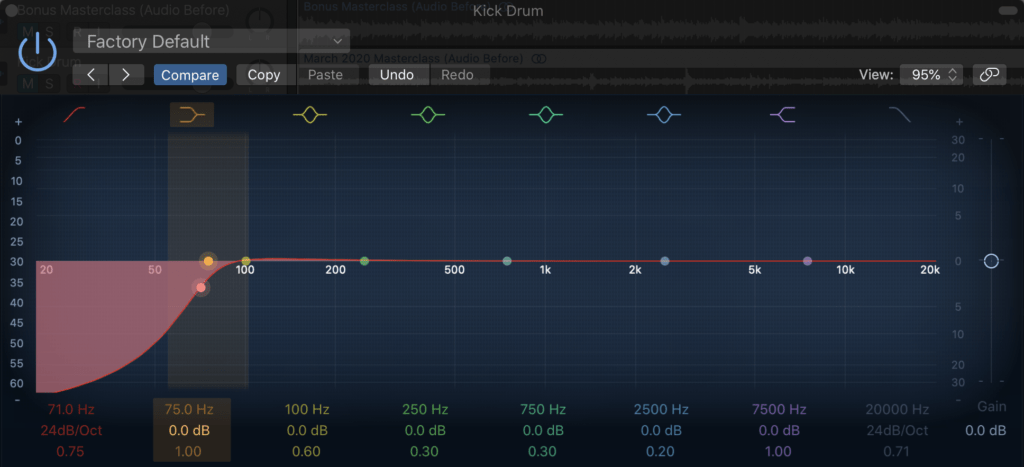
- Uncontrollable Sub Bass – Depending on the mic, its placement and your kick drum; you may find yourself with heaps of low-end frequencies that are making your kick sound messy and unclear. This area is also where you get lots of floor noise/rumble, which takes up unnecessary room in a mix. This problem is easily fixed with a HPF (high pass filter), usually around the 70-80Hz area.
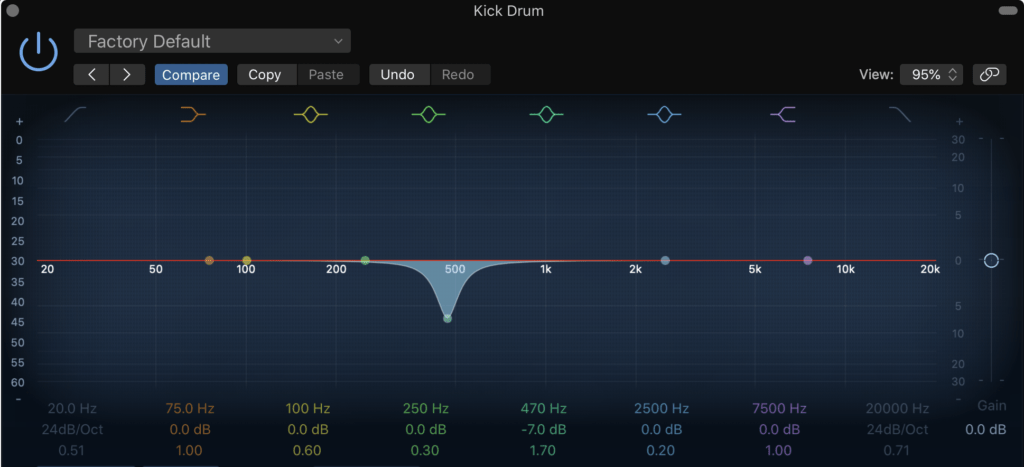
- A ‘Boxy’ Kick Drum Sound – ‘Boxiness’ tends to be a common issue and gives your kick a really cheap sound, almost like the sound of smacking a cardboard box (hence the name). If you aim to cut 5-10dB with a parametric filter at around 500Hz with a fairly narrow Q, you will immediately begin to notice an improvement in sound.
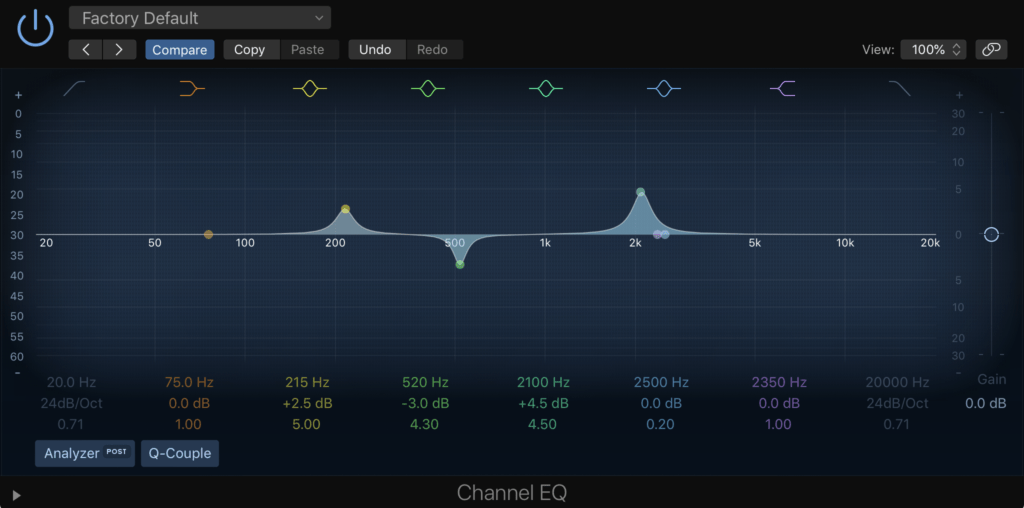
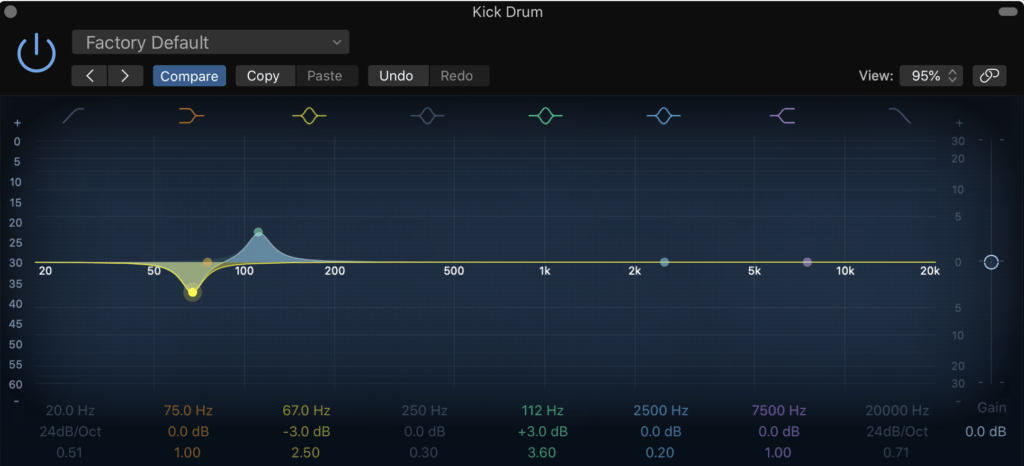
- Kick Drum And Bass Guitar Masking Together – In most mixes, the kick drum and bass guitar are the main low-end focused elements. They both share similar frequencies and therefore a lot of the time, are fighting for space. This causes ‘masking’ which means they both glue together, making it hard to differentiate them from each other in a mix. This is a problem because we want clarity and want to be able to hear what the kick and bass are doing, independently from each other. As a very rough guide, the main impact of a kick drum sits around 90-120Hz whereas the bulk of the bass sits below that, sometimes as low as 40-50Hz. This means we can apply a small boost within these ranges for both the kick drum and bass. Then, we apply a cut in the range for the opposite track, to clear some space. Just 3dB parametric cut and boost on each channel, creates 6dB worth of space/separation for your kick drum and bass. Feeling lost? Here is an EQ diagram for context.
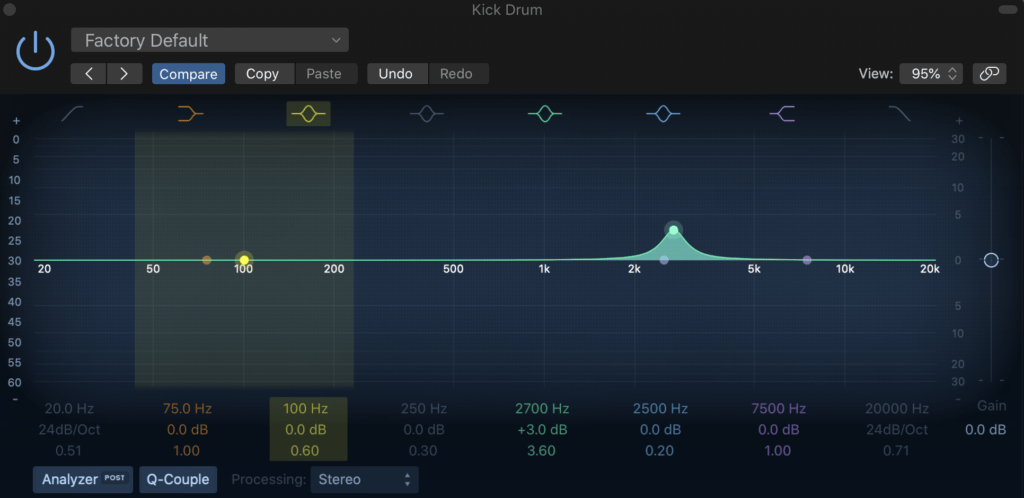
- Lack Of Kick Drum Presence In A Mix – Sometimes you spend so much time making your kick drum sound great by itself, but as soon as you play it with the rest of the mix it gets lost. This is NOT the point where you should crank up the fader, as it will make your mix messy! Some people will immediately think to add more low end in their kick drum EQ settings, after all, most of the kick is made up of low frequencies, right? Well surprisingly this is not the best thing to do, this will just overfill your mix with too much low-end resulting in a poor overall sound. To add more presence to your kick drum, you actually add high frequencies. More specifically, a parametric boost of up to 6dB around 2-4kHz will make your kick drum sound much more ‘up-front’ in a mix. Careful though, the more you boost, and the higher up the frequency range you go, the more clicky and metal-like this will sound.
Most Popular Kick Drum EQ Frequency Bands
I’m not a fan of EQ-related articles that tell you exactly what you should/shouldn’t do and come up with one-size-fits-all frequencies. These don’t exist, truth is there are that many variables; the tuning of your kick, the bass drum beater, the size of the drum, the kick drum mic you use and its placement.
So in this section, I’m going to show you the generic frequency ranges where you can expect to hear/find certain characteristics of your kick. This is so you can then take these, experiment, see what works for you and what suits your own style/taste. Remember, music is a creative art, not something you follow using a manual!
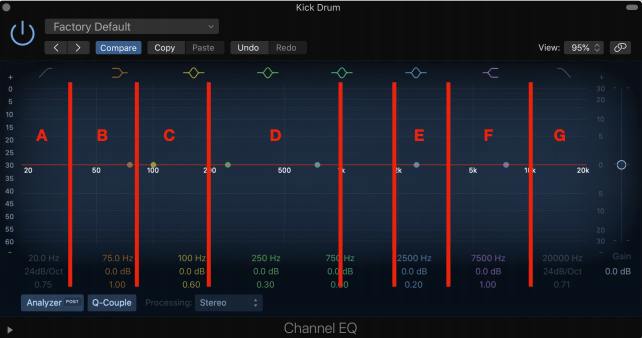
A) 20-50Hz – This area is mostly useless for most kick drum recordings, unless a sub bass mic has been used. Here you’ll find rumble and floor noise that you’ll almost always want to get rid of. Nothing interesting down here!
B) 50-80Hz – Words associated with this area are; boomy, fat, and thud. If you want to achieve more or less of this, this range is usually where you’ll find the majority of it.
C) 80-200Hz – The kick drum isn’t just made up of low lows. As we creep up past 120Hz you can add plenty more power and impact by boosting around here.
D) 200Hz-1kHz – As I mentioned earlier, to get rid of any boxiness and cheapness, the middle of this area at around 500Hz is usually the sweet spot. Admittedly, you will be mostly cutting frequencies in this area, doing so will normally help you achieve a more rounded and clear sound.
E) 2-4kHz – Here is the ideal area to boost/cut if you want to create more/less presence or attack for your kick drum, which will make it stand out much more in a mix or prevent it from being too up-front.
F) 4-10kHz – Calling out you metalheads! This is the area that you can boost if you want to add more click to achieve that super treble-y signature metal kick drum tone. Alternatively, if you’ve recorded with a clicky mic like an AKG D112 and want to get rid of some high frequencies, this is the area to cut.
G) 10-20kHz – Anything in this frequency band can only be described as a ‘hiss’ and serves no real purpose for the sound of your kick. A low shelving cut around this area could free up more room for cymbals if the kick drum mic has picked up a lot of frequencies here. However, most dynamic mics will not pick up much content in this area.
Kick Drum EQ Summary
Now you have all the general knowledge and guidance you need to tackle any EQ-related problem regarding your kick drum. These frequency bands will give you the freedom to explore your kick drum EQ settings and learn what frequencies work best for the sound you want to create.
If you want to learn more to help your mixes reach the next level, then be sure to head over to my guide on kick drum compression!
━━━━━━━━━━━━━━━━━━━━━━━━━━━━━━━━━━━━━
This guest blog was written by my friend Eddie at Professional Musician Academy. The Professional Musician Academy is the #1 online business school for aspiring professional, hired-gun, and session musicians. Their mission is to help you monetize your passion for music so you can do what you love for a living.